A single smile from a lost loved one can change everything.
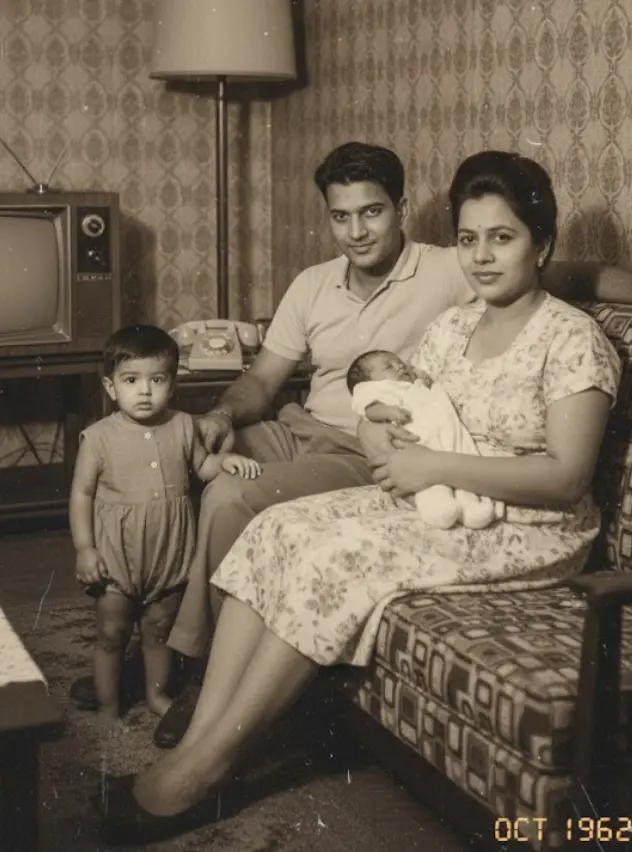
For decades, photographs were frozen moments. If you wanted to remember how your grandfather laughed or how your mother looked when she turned her head, you had to rely on fading memories or rare, grainy home movies.
Today, that limitation is gone.
Live Portrait technology—part of the rapidly growing $26 billion “Digital Legacy” industry—allows anyone to transform a static, damaged antique photo into a lifelike animation in seconds. This isn’t just about making a picture move; it is about reclaiming a sense of presence that time has stolen.
In this guide, we will cover exactly how to create these portraits, the psychology behind why they matter, and the step-by-step workflow to get professional results without needing expensive hardware or video editing skills.
What is a “Live Portrait”? (The Definition)
A Live Portrait is a synthetic video generated from a single still image. Unlike standard video editing (which requires raw footage), this technology uses Generative AI to predict and render movement where none existed.
The AI analyzes the geometry of the face in your photo—mapping the eyes, nose, mouth, and jawline—and then applies the movement of a “driver video” (a pre-recorded human acting out a smile or a nod) to your image.
The result: A 5 second high-definition video where your subject blinks, smiles, tilts their head, and looks directly at you.
Key Distinction: This is different from a “Deepfake.” Deepfakes typically swap faces (putting your face on a movie star). Live Portraits preserve the identity of the original photo but grant it the ability to move.
The Psychology: Why We Animate the Dead
Before diving into the “how,” it is critical to understand the “why.” This technology often triggers a powerful emotional response known in psychology as “The Uncanny Valley vs. The Comfort of Recognition.”
Research into Continuing Bonds Theory suggests that maintaining a connection with deceased loved ones is a healthy part of grieving. Static photos help, but human recognition is wired for motion. We recognize people by their micro-expressions—the way they squint when they smile or how they tilt their head when listening.
When AI successfully replicates these micro-movements, it bridges the gap between “remembering” and “experiencing.”
- The Reaction: It is common for users to cry when seeing a Live Portrait for the first time.
- The Advice: We recommend sharing these animations privately with family first, rather than posting publicly immediately, as the emotional impact can be intense.
Phase 1: Preparing Your Old Photo (Crucial Step)
The number one reason for a “bad” or “glitchy” animation is a poor source image. If you feed the AI a blurry scan, it will produce a blurry, warping video.
1. The “600 DPI” Scanning Rule
Most home printers scan at 200 DPI (Dots Per Inch) by default. This is fine for photocopying documents, but terrible for AI animation.
- The Rule: You must scan your photo at 600 DPI minimum.
- Why: AI needs pixel density to separate the “face” from the “background.” At low resolution, the AI might mistake a shadow on the wall for part of the hair, causing the wall to move when the head turns.
2. Crop for Focus
AI models are trained on square or vertical portraits.
- Action: Crop your photo so the face takes up roughly 50-60% of the frame.
- Avoid: Wide shots where the person is tiny in the distance. The AI cannot “invent” facial details that aren’t visible in the pixels.
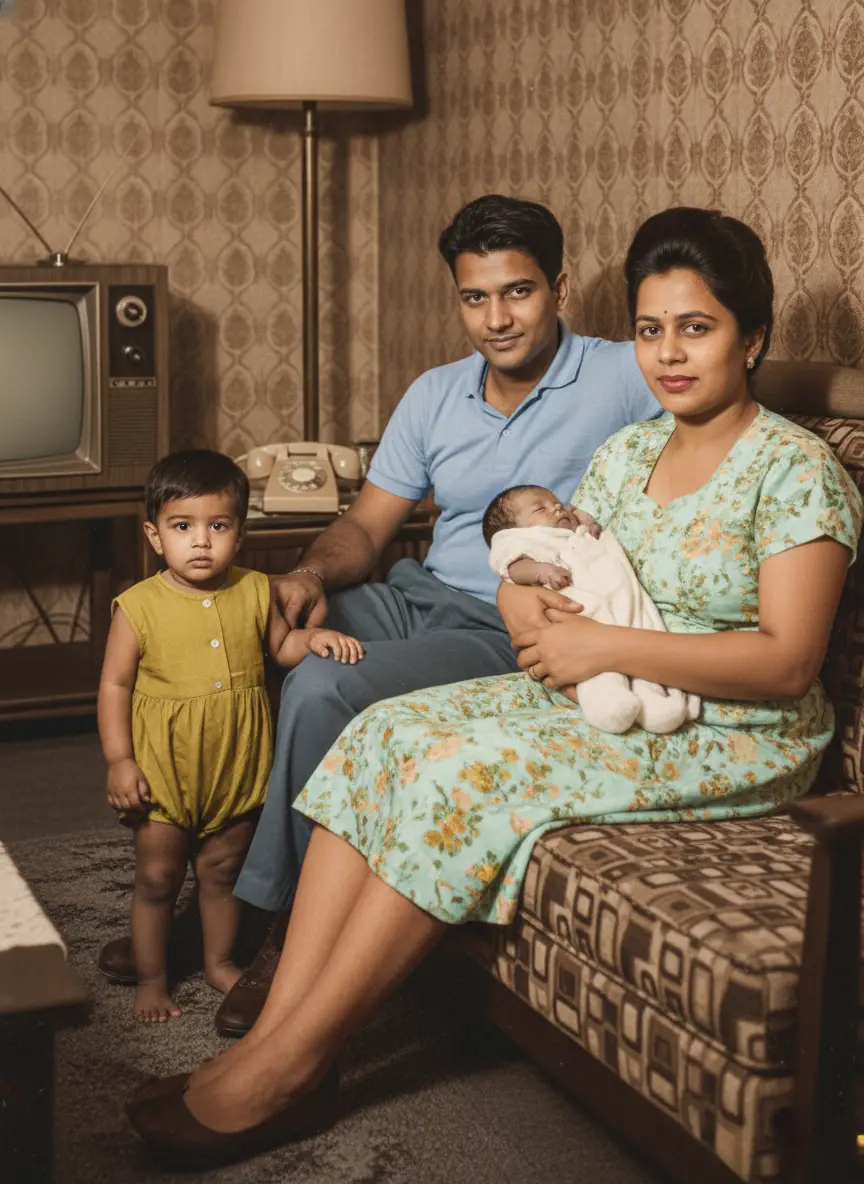
3. Restore Before You Animate
This is the Pro Tip.
Old photos have scratches, tears, and fading. If you animate a photo with a scratch across the cheek, the scratch will move with the face, breaking the illusion.
- Workflow: Always run your photo through a Restoration Tool (like BringBack.pro’s Restore feature) to clean the skin and sharpen the eyes before applying animation.
Phase 2: Choosing Your Tool
In 2026, there are three main tiers of tools available for creating Live Portraits.
Table: The Live Portrait Tool Landscape
| Tool Tier | Best For | Pros | Cons |
|---|---|---|---|
| BringBack.pro (Indie) | Families & Beginners | Affordable ($4.99 plans), built-in restoration, privacy-focused. | Focused on portraits, not full-body. |
| MyHeritage (Corporate) | Genealogy Research | Integrated with family trees, massive database. | Expensive annual subscriptions ($100+). |
| Runway / Sora (Pro) | Filmmakers | High control, cinematic resolution. | Extremely complex, steep learning curve. |
Our Recommendation: For 90% of users who just want to animate a grandparent’s photo, BringBack.pro offers the best balance of price and simplicity. You don’t need a subscription, and it handles the “Restoration + Animation” pipeline in one place.
Phase 3: Step-by-Step Workflow (How to Do It)
Here is the exact process to create a studio-quality Live Portrait using BringBack.pro.
Step 1: Upload and Restore
Navigate to the dashboard and upload your scanned image.
- Action: Click “Restore” first. Wait 10 seconds. Download the restored, clean version.
Step 2: Select the “Animation Driver”
Re-upload your restored photo to the “Animate” tool. You will be presented with a choice of animation styles.
- The Nostalgia Driver: A slow, gentle smile with a slight head tilt. Best for somber or respectful portraits.
- The Joy Driver: A wider smile and a nod. Best for wedding photos or happy memories.
- The Reunion Driver (New): A complex sequence where the subject looks around as if searching for someone, then locks eyes with the camera and smiles.
Step 3: The “Identity Lock” Check
Once the video generates (usually 60-90 seconds), pause it and look at the eyes.
- What to look for: Does the person still look like them?
- Troubleshooting: If the face looks “generic,” it means the animation intensity is too high. Try a subtler driver (e.g., “Blink and Nod” instead of “Big Smile”).
Step 4: Export and Share
Download the video as an MP4.
- Sharing: MP4s are compatible with WhatsApp, iMessage, and Instagram Stories.
- Physical Display: Many users now upload these MP4s to Digital Photo Frames (like Aura or Skylight), creating a “Harry Potter” style frame in their living room where the photo comes to life every few minutes.
Advanced Techniques: The “Reunion” Video
Beyond simple movement, advanced AI now allows for Multi-Person Interaction.
If you have a photo of your grandmother alone, and a photo of yourself, tools like BringBack can now synthesize a “Hug Video.”
- Input: Photo A (Grandmother) + Photo B (You).
- Process: The AI places both subjects in a shared 3D space.
- Result: A video where you walk into the frame and hug her.
Note: This technology is cutting-edge. It works best when both photos have similar lighting and camera angles. It is the closest technology has ever come to a literal “reunion.”
Common Mistakes to Avoid
We analyze thousands of failed animations. Here is what causes them:
1. The “Profile View” Error
Live Portrait AI is trained primarily on front-facing faces. If you try to animate a photo where the person is looking 90 degrees to the side (side profile), the AI will try to twist their head to look at the camera, resulting in severe distortion.
- Fix: Only select photos where the person is facing forward or at a slight 45-degree angle.
2. The “Busy Background” Glitch
If your subject has frizzy hair and is standing in front of a complex background (like a forest), the leaves might start moving with their hair.
- Fix: Use a tool to “Remove Background” first, replace it with a solid color or blur, and then animate.
3. Over-Animation
Just because you can make great-grandpa sing a pop song doesn’t mean you should.
- Ethics: We strongly advise against using lip-sync features for comedy on deceased relatives. It often feels disrespectful to surviving family members. Stick to natural, silent movements (smiling, blinking, looking) for the most meaningful impact.
Conclusion: A New Way to Remember
For the first time in history, death does not mean the end of movement.
While no technology can truly bring someone back, Live Portrait AI offers a digital echo—a way to see the spark in their eyes one more time. It transforms a dusty, forgotten album into a living archive.
Ready to try it?
You don’t need a high-end PC. You don’t need to learn video editing.
Go to BringBack.pro, upload your favorite photo, and see them smile again in under 60 seconds.
Your history is waiting to move.